Edited 24 September to add: if you like this tutorial, check out my new pattern for matching cushions! It’s available as PDF or printed pattern, is in my Etsy store now and uses a new interfacing method which is not only quicker than most patchwork, but also super-good for supporting precious but aged scraps of fabric.
As promised, a post that is not about my garden. Nor is it about my wedding, a fact that will surely astound any friends and family who are reading this!
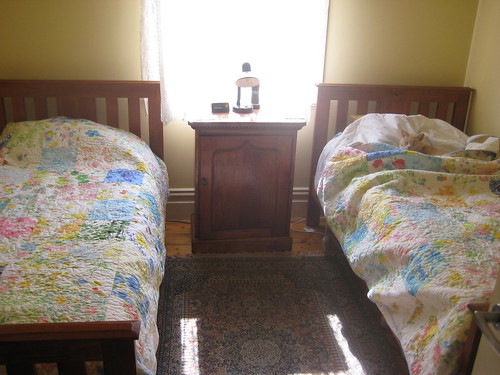
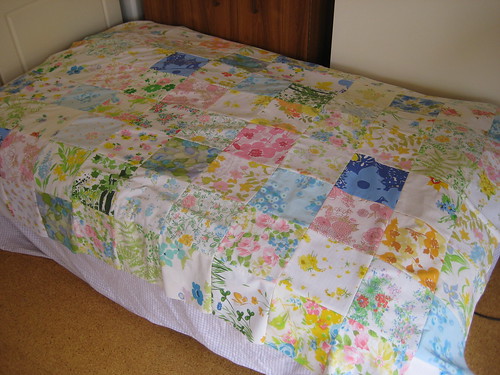
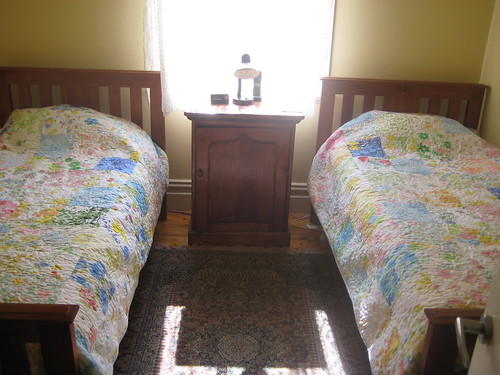
I made a custom order about two months ago from vintage sheets. Much like my Grandma’s Vintage Sheet Quilt, these matching twin quilts are made from sheets and pillowcases from the 60s and 70s: the kinds of sheets we had in our house when I was growing up, as well as the kinds of sheets I wish we had. I took pictures along the way and thought that others might be interested in a tutorial.
This is the simplest kind of quilt I’ve ever made and it can be constructed with nothing more than a sewing machine, a flat space, and an iron. It breathes new life, beauty and strength into sheets that have worn in some places: worn and faded patches can be discarded, and the good fabric kept. Experienced patchworkers might feel a little impatient to get past the details in these instructions. I’ve deliberately tried to make it simple, because a vintage sheet quilt is the perfect low-cost, high-reward first quilt for a newbie.
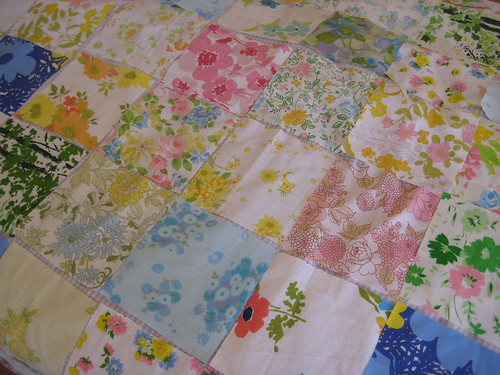
First, cut out your pieces and arrange in a pleasing pattern. I used a large square cut from an A4 piece of paper as my template, drawing around it with a soft pencil. Those who have fast cutting equipment will doubtless prefer to use that at this stage.
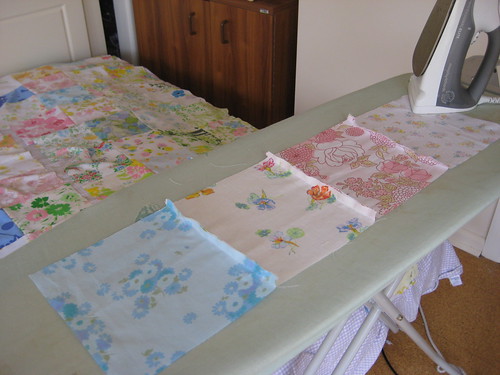
Then sew some strips together and iron seams flat. In these single bed quilts, I went for eight squares across, so I built in fours. If placement is important, place a pin in the bottom right hand patch. Then you’ll always know which way is up when you go to replace the strip in your arrangement.
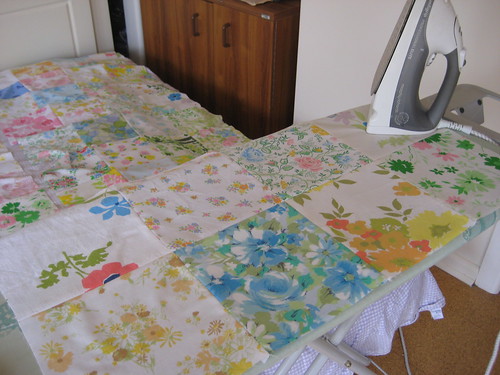
Then sew fours together into eights, and so on…

…until you have one half sewn together! Again, use a pin in the bottom right hand corner.
Then pin and sew the two halves together. At this stage you can lay it over some batting and backing. When putting your three layers together, tack them together in an all over criss- cross pattern, or use a series of safety pins (this last option is better for everyday use quilts than those you’d like to be *perfect*. Now quilt it.
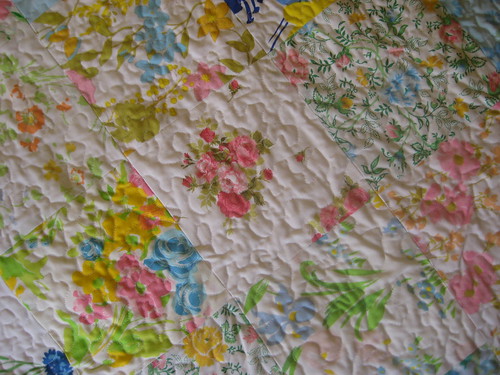
Alternatively you can lay it over a second full sheet and tie it together. A lovely example of a simple, tied coverlet can be found here. I used soft flanelette for these quilts. With any other style of quilt, I’d use cotton backing because flannelette doesn’t last forever. But let’s face it: vintage sheet quilts aren’t going to last into your grandkids’ lifetimes. They’re soft and they’re for enjoying now.
Bind the quilt with commercially purchased bias binding, or cheat by folding and sewing a pretty ribbon around the raw edges 🙂
That’s a whole quilt — or in this case, two quilts — made with no more equipment than a sewing machine and an iron.
Then find yourself a picturesque cat.
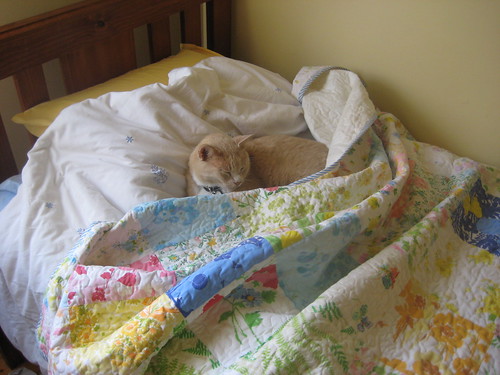
And you’re done.
Flickr set is here.
This is the first tutorial I’ve done at pinsandthimbles. Did it make sense? I’d be grateful for any suggestions you might have!

February 6, 2009 at 10:18 pm
Lovely quilts! I wouldn’t have thought of using sheets this way.
The tutorial is easy to follow as far as I see it. I would also advise new quilters that when putting your three layers together (front, batting and backing) tack them together well in an all over criss- cross before quilting or the layers will move.
If I didn’t already have so much fabric, I would start opping for sheets after reading this!
February 7, 2009 at 12:24 am
I loved the earlier vintage sheet quilt you made, and I have to say two quilts is even better. I think I’m going to have to start shopping for vintage sheets now.
February 7, 2009 at 7:24 am
Absolutely lovely!
February 7, 2009 at 10:22 am
Thanks everybody! Joanne, I’ve changed the post accordingly — thanks, I’d forgotten that step.
Carrie, vintage sheet shopping is addictive! It’s a real thrill-of-the-hunt…
February 13, 2009 at 9:18 am
wonderful!! A very nice tutorial 🙂 i LOVE the colours – just so pretty!
March 4, 2009 at 11:19 am
I am in love with this and will get started right away 🙂
~ Jodi
May 17, 2009 at 8:12 pm
I found your blog on google and read a few of your other posts. I just added you to my Google News Reader. Keep up the good work. Look forward to reading more from you in the future.
May 27, 2009 at 10:34 am
Hi, this is a great tutorial, with a beautiful result! I’m inspired to do one like this, but I was wondering what size you made the squares of fabric.
Thank you,
H
May 27, 2009 at 10:49 am
This was made very simply by folding a sheet of paper to make a square and then tracing around the square. An A4 sheet of paper makes a square of 21cm and then I took 1cm each side for seam allowances. Finished squares are thus 19cm. That’s slightly more than your average quilting seam allowances but I think it helps when dealing with somewhat aged fabric.
June 16, 2009 at 2:13 pm
[…] i’m thinking i might use the pink sheets for a quilt or spread for nearlyMabels bed, i’ve even found a wee tutorial from Anne at Pins&Thimbles […]
June 17, 2009 at 1:51 am
Your quilts are simply beautiful!!! Thank you for posting this, what a great idea. I’m off to find some old sheets, maybe I’ll visit my mother’s closets! he he
June 23, 2009 at 9:23 am
[…] girls, lots of aprons (maybe one or two like this). Then maybe we’ll use the scraps to make a vintage sheet quilt, too. I just love vintage fabric and I think these prints are too pretty to tear up for crocheted […]
June 25, 2009 at 1:58 am
Lovely, I’m working on a vintage picnic quilt right now with old sheets. I love thinking of those fabrics getting a second chance at life!
July 12, 2009 at 10:34 am
Found you by pure chance. This is how I make my quilts, with old fabric which I hunt out from anywhere and the quilts come out beautifully like yours, especially with stipple quilting. But why do most quilters prefer to buy fancy “named” fabrics and fat quarters at £7 a time. It seems to defeat the object of quilting and anyway I get far more pleasure from using something old and the outcome is always lovely with a quaint charm of its own.
July 21, 2009 at 12:56 am
Hi Anne-does it matter if poly/cotton sheets are used or are pure cotton ones best? Thankyou,Debbie p.s. the quilts are beautiful-you’ve really inspired me!!
July 21, 2009 at 6:50 pm
Hi Debbie! Most of these are poly cotton — it’s just the way the sheets came. Works great 🙂 — and thanks for the kind words!
July 25, 2009 at 9:01 am
Hi Anne, I goggled “Vintage sheet quilt” for some inspiration and your blog came up first! Awesome quilt. Do you mind if I post a picture of your quilts on my blog? I’ll link back to you… I love them so much I want to just rush off and make them.
I’ll pop back sometime and read some more of your blog.
Deb 🙂
July 25, 2009 at 12:53 pm
Thanks Deb! I’d love to see my photos on your blog — and come back any time 😀
July 26, 2009 at 9:50 am
OK Deb , now you’ve gone and done it! I LOVE the vintage sheet quilts and now I have to make one…or two..you are on my favorites and I will check back often!
August 31, 2009 at 11:56 am
Lovely quilts… thanks for sharing!
September 24, 2009 at 7:58 am
Love, love, love your quilts. I have never quilted before but have always admired quilts and bought them. This vintage sheet quilt will be my first one. Thank you for the great instructions. Louanne
September 24, 2009 at 9:18 am
I am a very beginner quilter and am wondering what size the blocks are? My Mom used to make these quilts and I have been looking everywhere for a pattern. Thanks Loads Carole
September 24, 2009 at 9:28 am
2 of those blocks I swear were from sheets I had on my bed when growing up!! It was so fun to see this and what a great tutorial. Thanks! You made my day.
September 24, 2009 at 9:32 am
Really love these quilts, and your instructions are so precise, couldn’t miss. I don’t have any vintage sheets, or any place to buy them, so I am going to make them from extra sheets I have around the house. Thanks so much.
September 24, 2009 at 9:48 am
Thanks for the idea. A beautiful quilt. I am always looking for ideas for repurposing items.
September 24, 2009 at 12:10 pm
Beautiful! And, being a beginning sewer (is that a word??) I love this idea and it seems like I could handle it. I don’t know how to do the quilting though. I just have a regular sewing machine. Can you elaborate on how to do the quilting part?
Thanks, and I look forward to seeing more of your projects!
September 24, 2009 at 12:13 pm
Thank you, Trish! There is a link above to a machine quilting tutorial. It’s not hard, though. You need to buy a darning foot for your machine. When it’s attached, lower the feed dogs of your machine (but remember to check that the foot is ‘down’ as far as it will go. Then you will be able to stitch in all directions, just as you would darn a sweater. Hold the fabric loosely — don’t push it down, hold it as you would an embroidery hoop — and swish it around whilst sewing. It takes a little practice but it sure is fun!
September 24, 2009 at 1:20 pm
Love the quilt. I am a beginner quilter and would love to try this. But, would you break the block size into inches. I don’t know how to figure cm.
Thanks
Betty
September 24, 2009 at 4:06 pm
Sure, Betty, the block size on these is 8.5″. Use a scant half inch seam allowance.
September 24, 2009 at 4:07 pm
Sorry — to be clear — they are 8.5″ cut, a little over 7.5″ when sewn.
September 28, 2009 at 1:22 am
…Very cozy quilts! I have also seen this done with vintage hankies sewn to the top of a sheet.
September 28, 2009 at 11:53 am
A QUICK AND EASY XMAS PRESENTS THIS YEAR!
I LOVE OLD TIME QUILTS, REMINDS ME OF MY
GRANDMOTHER
October 18, 2009 at 11:06 pm
Hi
One of your blocks is from the same sheet that I have that belonged to my mother.
So strange to see it on your page.
What a great idea to use sheets.
thanks for sharing
Judi Nashua NH
October 30, 2009 at 11:14 am
[…] left me keen to use my stash of vintage sheeting in other projects too. I love this quilt on the Pins and Thimbles website and will definitely be giving that project a go when the market and festive madness is […]
October 31, 2009 at 6:07 pm
This is really inspiring. My sweet grandma passed away a couple of months ago and I have inherited all of her sewing collection, along with materials and old sheets. This is the perfect thing to create!!! I am unsure of how to do the three layers together, but I’ll do a practice run before I stitch the real thing. Thanks for the inspiration!
November 15, 2009 at 2:56 pm
I love these quilts! I keep coming to your site over and over for inspiartion but now that I have been making potholders successfully I am beginning to muster up the courage. Thanks for the great pictures, visuals, and easy instructions. Your site is fantastic!
January 1, 2010 at 10:07 am
Hi,
Your quilt looks awesome and you have clear instructions. Could you Pl let me know how many squares you have assesmbled down, since you have mentioned that there are 8 across.
Thanks.
January 16, 2010 at 12:12 pm
Ever since I saw this a few months ago, I was inspired to start shopping for vintage pillow cases and/or sheets. I thrift shop BIG time, and have begun collecting vintage linens for this very project. LOVE IT!
January 16, 2010 at 3:08 pm
HI
You don’t say what size blocks to use it also would be helpful if you highlighted any and all e-mail address such as web addresses for us to click on.
thanks
love your sheet quilt
January 20, 2010 at 12:07 pm
I love this idea and will be trying my oen variation soon. I’ve gotten free vintage sheets on Freecycle.org. It’s a legit and FREE site where people give and receive items locally. You can join the freecycles in your area. I’ve given and received a lot of stuff. One of the great things is you can get rid of junk right away rarher that save it for a yard sale because you get as much or more to make up for it. I’m all about repurposing and not filling landfills. Thanks!
February 4, 2010 at 9:17 am
At last – a quilt I can do – instrucitons I can follow!!! Thank you Thank you Thank you Thank you – I have wanted a quilt I made for so long and I’m already underway. Love it – thank you again for sharing (lovely cat too!)
February 4, 2010 at 9:18 am
I was so excited I got “instructions” wrong – sorry!!
February 4, 2010 at 11:02 am
I am making quilt from old material, shirts, dresses(all things nobody wears anymore) and sheets as well. I have made templates of plex-a-glass and use them instead of paper. They make cutting squares much easier. I use 5×5,8×8,10×10 and 12×12 inch squares. Our ladies of the quilting circles of my church put them together and we sell them at our Craft Fairs as a money making project. We are hopeing to build a new sanctuary some time soon.
Love the way the quilts look in your blog. Love your site. You have may ideas to share and they are wonderful.
November 30, 2014 at 8:05 am
I make quilts for myself and my family and here in Canada our winters are very cold and we get lots of snow. I have been quilting by hand as well as piecing for a mighty long time. Just now I am making a Double Nine Patch out of old clothes and taking old top sheets to use them as a backing and using flannelette as well as old bottom sheets to use as a filler. I made a Grandmother’s Fan quilt top a number of years ago and took an old quilt top that I made and didn’t like the colors so I used that as a backing and filled it with an old blanket and my daughter loves it very much. Recycle everything you can folks. This lady gave me another inspiration and I thank her very much for more ideas.
February 5, 2010 at 8:36 am
Thank you for sharing how to make
a quilt.
March 23, 2010 at 5:30 pm
Would love to have your tutorial on my new blog: the Vintage sheet Blog. If you would like your tutorial to appear please email me at http://roseylittlethings@gmail.com
April 17, 2010 at 8:28 am
This is beautiful! Thank you for sharing your wonderful blog and your enthusiasm for the art of quilting. Check out our blog at: http://www.aqsquiltnews.blogspot.com/
Keep up the beautiful quilting!
June 11, 2010 at 12:27 am
Where would you look for vintage sheets? I am a beginer with little fabric and little money so this is a great alternative! Thank you for this post!
July 29, 2010 at 8:04 am
This really makes me miss my grandma and her lovely sheets. Just wish some of the sheets were still around so that I could make some of these quilts. Hummm, off the to flea markets I go!
July 30, 2010 at 1:37 pm
I love the twin quilts! I have also received vintage sheets from Yahoo Groups FreeCycle. In fact, I just picked up 4 garbage bags of fabric!
I also regularily shop the local Goodwill for sheets. I found sheets to make over into: duvet covers; extra-long sheets for college-bound grandkids; quilt backings; placemats and pot holders. Out local Goodwill usually has a large bin filled with sheets and sheet sets. I found my daughter a complete bedding set including the comforter for less than $20(US). Full, queen or king sized sheets are $3.62 each and sets are $7.
August 22, 2010 at 2:20 pm
Thanks so much for a great tutorial! I stumbled across it when searching for instructions because I want to make a quilt for my son and this is just what I was needing:)
September 8, 2010 at 12:50 pm
Hi! Love your quilts and sheet selection! Yum!
I have a VERY important question for you – Pleeeease help! I have been quilting with cotton for years and have always prided myself on NO puckers, front or back, when I freemotion the quilt. I have made 3 vintage sheet quilts so far and they have ALL puckered on the back! What in the world??? I can’t stand it! Is polyester the culprit? Do any of your vintage sheet quilts pucker on the back on you? Please help!
Thanks!
Susie
September 9, 2010 at 3:31 pm
Hi Susie! When I quilt with these I am almost always using fleece on the back. This may be where we’re having different results. Polyester does tend to stretch a little more than cotton, which is OK when meander quilting a top but less good when you’re using it to back a quilt. I’m sorry but I can’t think of an easy fix, except perhaps to try a cotton or fleece backing.
September 18, 2010 at 9:18 am
My mom was quite a quilter and used many a sheet on the backs of her quilts. We bought sheets to make ourselves granny dresses in the ’70s because there was so much fabric in a sheet and they were cheaper than fabric by-the-yard. One of my dresses is in your quilt!
September 18, 2010 at 10:32 am
I love your quilt made from sheets. I made a quilt using leftover fabrics from flannel nightgowns. I used a flannel blanket sheet for the batting and used muslin to back it. The flannel isn’t as good a quilting flannel however, I love the fact that all my nightgowns from childhood until adulthood are in it. The seams didn’t line up that well but I was just learning how to quilt and I was cutting everything out with scissors. I tied it with yarn. It may not look the best but I love it. It is perfect for a summertime quilt when you don’t want a lot of weight on you. It is also good for the winter with only an additional comforter with it. I made it 112 inches square and I never have to fight for my blanket. It covers both of us wonderfully.
Jenine
September 23, 2010 at 10:40 am
I am in love. I have been researching quilts and the quilting process for a couple of weeks ago. I really want to give it a try. This has sealed the deal. Even if I make a royal mess I will not have spent a lot of money.
Thank you Anne….wish me luck! 🙂
October 15, 2010 at 12:09 am
[…] To drive myself even crazier, I bought these beauties awhile back when we visited the local St. Vincent de Paul thrift shop at St. Michaels. I promised myself I would not get even consider another quilt, but these were too pretty to leave behind. For a lovely example of vintage sheet quilts, go here. […]
January 6, 2011 at 6:16 am
[…] fun. I had my eye on an Amy Butler pattern (careful, that link goes to a .pdf) but then I saw this post and I just have to try making a vintage sheet […]
February 7, 2011 at 5:54 pm
Love it.
June 17, 2011 at 10:51 pm
i have so many old sheets and this will be a great project for using them
June 18, 2011 at 2:07 am
that is just beautiful! and i recognize quite a few of those sheets from at our house growing up and from my grandma’s house! what memories!
July 22, 2011 at 12:30 am
I just love your quilts but I am amazed that these are made of poly/cotton. I thought quilters only quilted with 100% cotton. Why do so many quilters not use with poly/cotton. I was told that you can’t get stains out of poly/cotton like you can in cotton and that the material will pile after so many washing.
October 16, 2011 at 4:51 am
Fabric Appliques…
[…]How to Make a Vintage Sheet Quilt « pinsandthimbles[…]…
October 29, 2011 at 1:32 am
I absoslutely love this idea. I will be doing it!!
October 29, 2011 at 1:56 pm
How many old sheets did you use on your twin quilts?
November 10, 2011 at 2:24 am
stationary…
[…]How to Make a Vintage Sheet Quilt « pinsandthimbles[…]…
November 30, 2011 at 3:33 am
bloging…
[…]How to Make a Vintage Sheet Quilt « pinsandthimbles[…]…
December 1, 2011 at 12:42 am
Free MW3 Prestige Hack…
[…]How to Make a Vintage Sheet Quilt « pinsandthimbles[…]…
December 1, 2011 at 11:46 am
free gratis…
[…]How to Make a Vintage Sheet Quilt « pinsandthimbles[…]…
December 2, 2011 at 6:21 pm
fancy dress outfit ideas…
[…]How to Make a Vintage Sheet Quilt « pinsandthimbles[…]…
December 8, 2011 at 5:29 am
wordpress…
[…]How to Make a Vintage Sheet Quilt « pinsandthimbles[…]…
December 29, 2011 at 7:43 am
Descargar Plantillas WordPress Catalan, Descargar Plugins WordPress Catalan…
[…]How to Make a Vintage Sheet Quilt « pinsandthimbles[…]…
January 4, 2012 at 1:51 pm
Such a great post inspired people who read it..I’m waiting more good quality post from this, so bookmark!
January 5, 2012 at 6:01 am
best sewing machine…
[…]How to Make a Vintage Sheet Quilt « pinsandthimbles[…]…
January 11, 2012 at 12:06 am
De leukste filmpjes gratis plaatsen en bekijken….
[…]How to Make a Vintage Sheet Quilt « pinsandthimbles[…]…
January 17, 2012 at 9:10 am
Rent College TextBooks…
[…]How to Make a Vintage Sheet Quilt « pinsandthimbles[…]…
January 19, 2012 at 2:43 am
Duvet cover sets…
[…]How to Make a Vintage Sheet Quilt « pinsandthimbles[…]…
January 27, 2012 at 3:23 am
raman…
[…]How to Make a Vintage Sheet Quilt « pinsandthimbles[…]…
February 16, 2012 at 11:25 pm
Will have to give this a try-thanks!
March 13, 2012 at 6:05 am
brother cs6000i reviews…
[…]How to Make a Vintage Sheet Quilt « pinsandthimbles[…]…
March 26, 2012 at 4:50 am
I love, love, LOVE this idea!! I saw your tutorial a couple of years ago and went to a thrift shop and bought all the old sheets they had and only spent about $21.00!! What a steal, I ended up with a great big plastic garbage bag full~! I have yet to make a summer quilt from them, but still want to! I hope you don’t mind, I’ve posted the link to this tutorial on my Facebook page, the quilts in this tute are too pretty not to share!!
March 26, 2012 at 10:45 pm
suggest…
[…]How to Make a Vintage Sheet Quilt « pinsandthimbles[…]…
May 24, 2012 at 9:43 am
I love this, it’s so great to see the finished effect, My friend has just started quilting and has made something similar out of old duvets and other fabrics that were otherwise going to be wasted, I am so proud of her first ever attemt I would love to show it to you< I will show her your site tomorrow and you can garantee you have 2 new fans x
June 2, 2012 at 1:49 am
This quilting is called stipple quilting. If you are a newbie and just learning this will be difficult for you to do. Just pin as instructed and do simple up and down lines and then turn the quilt and line in the opposite direction. Simple to do and terrific results, like grandma used to do . 🙂
September 17, 2012 at 11:21 pm
Just found your site. Awesome!
November 25, 2012 at 11:34 pm
Just want to say your article is as amazing. The clearness in your post is simply cool and i could assume you are an expert on this subject. Fine with your permission allow me to grab your RSS feed to keep up to date with forthcoming post. Thanks a million and please carry on the gratifying work.
November 28, 2012 at 12:04 am
Hello! My girlfriend sent me this site because he thought it’s sweet and I have to agree with him. Very great post you have here:)
February 12, 2013 at 5:46 pm
philipine society of cosmetic surgeryPAPRASbelocosmetic surgeonsPSCS…
[…]How to Make a Vintage Sheet Quilt « pinsandthimbles[…]…
April 10, 2013 at 2:42 pm
It’s truly a nice and useful piece of information. I am happy that you simply shared this helpful information with us. Please stay us up to date like this. Thank you for sharing.
April 21, 2013 at 11:50 pm
I’m carrying out a paper on yoga and my points are how it really is helpful for guys, women, and children. Would be the advantages diverse adequate to obtain an excellent paper from it or ought to I change my factors? In case you do feel this can be a excellent strategy to lay out my paper, what would be the various positive aspects? Please give me some sites or other resources simply because regardless of how I lay it out, my paper has to be about yoga! Many thanks!
April 30, 2013 at 8:12 pm
Hello fantastic website! Does running a blog such as this take a lot of work?
I have very little knowledge of programming however I was hoping to start my own blog
soon. Anyways, if you have any suggestions or tips for new blog
owners please share. I know this is off topic nevertheless I just wanted to ask.
Kudos!
May 27, 2013 at 4:17 pm
Remarkable issues here. I am very satisfied to see your article. Thank you a lot and I’m taking a look ahead to touch you. Will you please drop me a e-mail?
May 28, 2013 at 2:53 am
Wishing I could find pretty, vintage sheets! All I’ve found are selling on Ebay/Etsy etc. for near retail prices and more! Our Goodwill sells sheets for up to $10 each and at those prices, I would cost me hundreds to find enough to make a bed spread like you did. I’m bummed! But so want to make one of these.
July 18, 2013 at 6:07 pm
Break your 3 normal main meals into 5 smaller portion sizes –
morning, snack, lunch, snack, dinner. Vitamin B3 or
also called as Niacin is important in weight loss because it is responsible for
the regulation of thyroid hormones and also in sugar levels
in the body. Expect to lose all that extra flabbiness as you melt off all your unwanted fat.
August 5, 2013 at 3:55 pm
Both drugs have also been denied FDA approval the first time
around and are awaiting news on their second attempt.
Vitamin B3 or also called as Niacin is important in weight loss because it is responsible for the
regulation of thyroid hormones and also in sugar levels in the body.
Hence, broccoli is a must-add ingredient in your vegetarian weight
loss diet.
August 26, 2013 at 5:38 am
Catch you visitor’s attention and encourage discussion and comment. Having a healthy experience of 3+ years, this company gives its solutions on Social media consulting, Social media marketing and Social media monitoring. The writer followed Slats from childhood into confused maturity as he tried hard to make sense of politics, allowing Royko to comment most humorously through him on all manner of things.
September 16, 2013 at 7:20 pm
I am regular reader, how are you everybody? This piece of writing posted at this web page is really good.
October 4, 2013 at 2:20 pm
In 2011, just 3 years later, businesses invested over #3 billion in social websites.
This is certainly true of several different businesses, of course, but Facebook puts an explicit
emphasis on it. The ‘like’ button is indeed a matter not to be ignored and to be taken at a serious note.
December 10, 2013 at 2:21 am
Thanks on your marvelous posting! I truly enjoyed reading it, you might be a great author.I will be sure to bookmark your blog and will
come back very soon. I want to encourage one to continue your great writing, have a nice holiday
weekend!
February 25, 2014 at 6:59 am
Anne, I loved your tutorial, and you have inspired me to explore my Mum’s attic next time I’m home for a bit longer – I’m sure to find some great fabric there. And you absolutely made my day with the final picture. I agree that a cat is essential for “full coziness” :-))
February 27, 2014 at 7:45 pm
Thank you,Anne. I am looking forward to sewing and having a few made by this spring/summer. It was be 17 degrees, tonight.
April 5, 2014 at 3:45 am
That’s what makes the distinction between good and exceptional reputation management solutions.
April 15, 2014 at 10:51 pm
magnificent points altogether, you just won a new reader.
What might you suggest about your publish that you just made some days in the past?
Any sure?
April 22, 2014 at 4:58 pm
You can certainly see your expertise within the work you write.
The sector hopes for more passionate writers like you who are not afraid to mention how they believe.
Always go after your heart.
April 23, 2014 at 2:01 am
Heya just wanted to give you a quick heads up and let you know a few of the images
aren’t loading correctly. I’m not sure why but
I think its a linking issue. I’ve tried it in two different internet browsers and both show
the same results.
April 23, 2014 at 10:33 pm
Hey! I could have sworn I’ve been to this site before
but after reading through some of the post I realized it’s new to me.
Nonetheless, I’m definitely happy I found it and I’ll be book-marking and checking back
often!
April 28, 2014 at 12:01 am
Hello! Quick question that’s entirely off topic. Do you know how to make your site mobile friendly?
My blog looks weird when browsing from my iphone. I’m trying
to find a template or plugin that might be able to resolve this issue.
If you have any suggestions, please share. Thank you!
May 10, 2014 at 2:14 am
Oh my goodness! Amazing article dude! Thank you so much, However I
am going through difficulties with your RSS. I don’t
understand why I am unable to join it. Is there anyone else having
the same RSS issues? Anyone that knows the solution will you
kindly respond? Thanx!!
May 19, 2014 at 12:38 pm
Way cool! Some very valid points! I appreciate
you penning this write-up and also the rest of the
site is very good.
May 21, 2014 at 1:32 am
wrinkle cream
How to Make a Vintage Sheet Quilt | pinsandthimbles
May 29, 2014 at 5:51 am
i am making one now…so after you sew this and u iron the fold part how is he folding part going to be not seen is what i need to know please
June 17, 2014 at 6:31 pm
Howdy just wanted to give you a brief heads up and let you know a few of the
images aren’t loading correctly. I’m not sure why but I think its a
linking issue. I’ve tried it in two different web browsers and
both show the same results.
July 17, 2014 at 7:46 pm
mazars financial planning
How to Make a Vintage Sheet Quilt | pinsandthimbles
July 22, 2014 at 1:23 pm
Garthtraining.Jigsy.Com
How to Make a Vintage Sheet Quilt | pinsandthimbles
July 24, 2014 at 2:46 am
bookblogger.org
How to Make a Vintage Sheet Quilt | pinsandthimbles
July 25, 2014 at 6:20 am
adalfinance.sosblogs.com
How to Make a Vintage Sheet Quilt | pinsandthimbles
July 26, 2014 at 3:35 pm
Kombes.com
How to Make a Vintage Sheet Quilt | pinsandthimbles
August 2, 2014 at 2:41 am
mediagoblin.pixelminers.net
How to Make a Vintage Sheet Quilt | pinsandthimbles
August 2, 2014 at 11:12 pm
or.kr
How to Make a Vintage Sheet Quilt | pinsandthimbles
August 4, 2014 at 3:10 pm
More suggestions
How to Make a Vintage Sheet Quilt | pinsandthimbles
August 6, 2014 at 4:35 pm
Check This Out
How to Make a Vintage Sheet Quilt | pinsandthimbles
August 12, 2014 at 8:23 pm
devittcrafts.blog.com
How to Make a Vintage Sheet Quilt | pinsandthimbles
August 14, 2014 at 9:51 am
I really like and appreciate your blog post.Thanks Again. cafdkecbgcge
August 14, 2014 at 9:51 am
Hey there, You have done a great job. I’ll definitely digg it and personally recommend to eddbdedggbga
August 19, 2014 at 6:18 am
unicron13.weebly.com
How to Make a Vintage Sheet Quilt | pinsandthimbles
August 19, 2014 at 7:35 am
tough economic times
How to Make a Vintage Sheet Quilt | pinsandthimbles
August 19, 2014 at 8:03 am
trips to australia
How to Make a Vintage Sheet Quilt | pinsandthimbles
August 20, 2014 at 8:34 am
Going Listed here
How to Make a Vintage Sheet Quilt | pinsandthimbles
August 20, 2014 at 12:44 pm
talking to
How to Make a Vintage Sheet Quilt | pinsandthimbles
August 20, 2014 at 2:40 pm
on the main page
How to Make a Vintage Sheet Quilt | pinsandthimbles
August 23, 2014 at 7:21 am
how to start a jewelry business
How to Make a Vintage Sheet Quilt | pinsandthimbles
August 25, 2014 at 4:30 am
browse around this website
How to Make a Vintage Sheet Quilt | pinsandthimbles
September 21, 2014 at 2:00 am
Everything is very open with a clear explanation of the challenges.
It was truly informative. Your site is extremely helpful.
Thanks for sharing!
September 21, 2014 at 8:28 pm
payday loan cash now
How to Make a Vintage Sheet Quilt | pinsandthimbles
September 26, 2014 at 2:03 pm
Thank you for another fantastic post. Where else could anybody get that type
of information in such a perfect means of writing?
I’ve a presentation next week, and I am at the look for such info.
October 23, 2014 at 1:50 pm
Tropicleanse Review
How to Make a Vintage Sheet Quilt | pinsandthimbles
November 28, 2014 at 6:03 pm
[…] How to Make a Vintage Sheet Quilt | pinsandthimbles – Feb 06, 2009 · February 7, 2009 at 12:24 am. I loved the earlier vintage sheet quilt you made, and I have to say two quilts is even better. I think I’m going to have to …… […]
January 16, 2016 at 6:36 am
So if you’re one such parent, don’t be embarrassed. ArticleSource: is simply the best Tutorial on how to backup and play your video games.Freeware is simply a way for them to get their product out there are share it with likeminded others.
January 18, 2016 at 8:07 am
What i don’t understood is in fact how you’re no longer actually much more smartly-preferred than you may be now.You’re so intelligent. You realize therefore considerably relating tothis matter, made me in my opinion consider itfrom so many numerous angles. Its like men and women don’t seem to befascinated except it is one thing to accomplish with Girl gaga!Your own stuffs great. At all times deal with it up!
January 30, 2016 at 1:35 pm
[…] Part of a tutorial set on how to make a vintage sheet quilt: for the full tute have a look at pinsandthimbles.wordpress.com/2009/02/06/how-to-make-a-vi… […]
January 31, 2017 at 12:53 pm
Click Here
How to Make a Vintage Sheet Quilt | pinsandthimbles
February 1, 2017 at 11:28 pm
lee esto
How to Make a Vintage Sheet Quilt | pinsandthimbles
June 7, 2017 at 12:00 am
An instance of natural medicine is acupuncture.
July 13, 2017 at 3:33 am
There may be a lot more duties and responsibilities an internet developer
might need to perform, which often is he’s working on. Web
developers play an extremely crucial part in the market today.
While they have to be able to communicate effectively so as to understand what is needed to get the business done, almost all of their work is completed.
Backend web developers utilize coding languages to be certain each of those features in the site actually do the
job properly.
May 10, 2018 at 3:46 am
I dugg some of you post as I thought they were very helpful very useful
August 2, 2018 at 4:54 am
I know this web site provides quality depending articles and other material, is there any other web site which
presents such stuff in quality?
August 2, 2018 at 5:11 am
Thanks for the marvelous posting! I certainly enjoyed reading it, you can be a great author.I will be sure
to bookmark your blog and will come back from now on. I
want to encourage yourself to continue your great writing, have a nice
day!
October 19, 2018 at 9:42 pm
Do you mind if I quote a few of your articles as long as I provide credit
and sources back to your webpage? My blog site is in the
very same niche as yours and my visitors would definitely benefit from a lot of the information you provide here.
Please let me know if this alright with you. Appreciate it!
January 2, 2019 at 2:21 pm
Genuinely when someone doesn’t understand then its up
to other viewers that they will help, so here it takes place.
March 13, 2019 at 5:44 am
Hey, you used to write wonderful, but the last few posts have been kinda boring… I miss your super writings. Past several posts are just a bit out of track! come on!
May 14, 2020 at 2:02 am
Very clever post, I truly enjoy the web site, keep it up. How do you market your site? I encountered it on Google. If you have a chance check out my web site, it’s not as remarkable, but I ‘m only able to update it once a week. kelly kosky
May 18, 2020 at 2:24 am
saw your post on google and checked out a small number of of your early posts. Continue with the very good articles. Ill probably be by again to read more, thanks for the info! If you have a opportunity check out my site. It’s a work in progress, but I presume that someday it will have almost as good of substance as yours. kelly kosky
October 17, 2021 at 6:48 am
https://www.reddit.com/user/medyamagaza/comments/pdz5bv/instagram_takipçi_satın_al_25_tl/?utm_source=share&utm_medium=web2x&context=3
November 19, 2021 at 2:29 am
https://takipcihilelerin.com/blog/en-kolay-takipci-hileleri/
November 19, 2021 at 9:06 am
https://ucretsizhile.com/blog/yeni-ve-gercek-takipci-hileleri/